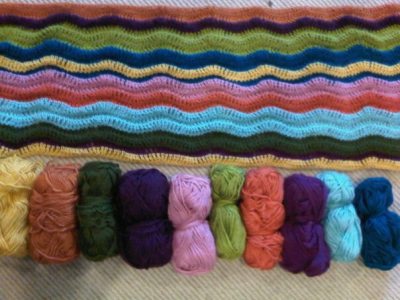
Its all about the ripple! Or zig zag or whichever?! Making a ripple is often seen as the right of passage into the crochet world, the use of increasing and decreasing opens up new doors to new patterns with a ‘yeah I can do that!’ but for some, the idea of increasing and decreasing to make a straight foundation chain wavy, is a bit daunting and frankly a little off putting. I’m going to show you two methods to get a similar outcome one easier than the other but both really pretty! So hopefully it opens new crochet doors for others! I’ve been recently commissioned to make a giant ripple for a bed so it was great practise for me too! Here is a pic of one that lives in my lounge.
When working back and forth and especially with blankets its important to ‘size up’ your hook for the foundation row and then revert back to the hook for that wool. So if you are using double knit weight you should use a 5mm hook for your foundation chain row and then switch to a 4mm for your first row. Here are my well used hooks 🙂 They are from Polymer Clay Shed a lovely little shop on etsy.
Holey zigzag – US terms
Size up your hook for the foundation chain, so if using DK weight use a 5mm hook.
Foundation chain multiples of 12 (+3)
So chain in multiples of 12 until your desired length and then add 3 for turning.
Change to your usual hook size for the yarn weight so if using DK use a 4mm.
Row 1: Dc in the 4th chain from the hook. 1dc in the next 4 chains.* Miss 2ch, 1dc in the next 5stitches, chain 2, 1dc in the next 5 stitches* repeat between *’s until last 7 foundation ch. miss 2ch 1dc in the next 4ch from foundation row, 2dc in the last chain.
Change yarn colour if desired.
Row 2: Chain 3, 1dc into the same stitch. 1dc in the next 4 stitches, *Miss 2, 1dc in the next 4 stitches, 1 dc into the chain 2 space. Chain 2. 1dc in the chain 2 space from previous round, 1dc in the next 4 dc* repeat between *’s across until last 7 stitches (one will be your chain 3 from previous row) Miss 2 1dc in the next 4, 2 dc in the top of the chain 3 from previous round.
Repeat row 2!
Here’s a swatch and a chart for more clarity 🙂
Next up is the ripple! This pattern is more famously known at Attic24 as the
neat ripple, as it isn’t holey like the one above. However when you look on Ravelry there are lots of versions of this very pattern, my aim is to make it simple as much as I can. The increases are pretty straight forward, essentially two stitches into the same place. The one stitch you may not have tried is the decrease, which essentially is making two double crochet’s (or two treble’s if you’re using English) but so they have one stitch at the top. Otherwise know as 2dctog (2trtog), the tog part meaning together, as you are essentially making 2 stitches together to become one stitch. let me walk you through it.
Yarn over, insert hook, Yarn over, pull through. 3 loops on the hook
Yarn over, pull through 2 loops on hook. 2 loops on the hook.
Yarn over insert hook into next stitch along, yarn over pull through. 4 loops on the hook.
Yarn over pull through 2 loops on hook. 3 loops on the hook.
Yarn over pull through all 3 loops. 1 dc2tog stitch!
Wavy Ripple
Size up your hook for the foundation chain, so if using DK weight use a 5mm hook.
Foundation chain multiples of 14 (+3)
So chain in multiples of 14 until your desired length and then add 3 for turning.
Row 1: 1dc in 4th chain from hook, 1dc the next 4 chains, *[dc2tog in the next 2 chains] repeat between [ ]’s once more. 1dc in the next 4 chains, [2dc in the next chain[ repeat between [ ]’s once more. 1 dc in the next 4 chains* repeat between *’s across until the last nine chains. [dc2tog in the next 2 chains] repeat between [ ] ‘s once more. 1dc in the next 4 chains, 2dc in the final chain.
Turn your work, change yarn colour if desired.
Row 2: Chain 3, 1 dc into the same stitch. 1dc the next 4 stitches, *[dc2tog in the next 2 stitches] repeat between [ ] ‘s once more. 1dc in the next 4 stitches, [2dc in the next st] repeat between [ ]’s once more. 1 dc in the next 4 stitches* repeat between *’s across until the last nine stitches (one will be your ch3 from previous round). [dc2tog in the next 2 stitches] repeat between [ ]’s once more. 1dc in the next 4 st, 2dc in the final stitch (the top of your ch3 from previous round).
Turn your work, change yarn colour if desired.
Repeat Row 2 until desired length.
Again here is a swatch and chart 🙂
So there you go! If you have any questions please just ask I’ll do my best to answer and help you out! Personally for babies I like the holey blanket, its a like a wavy cellular blanket, makes a change from the norm. If you like the more solid look which is great for a bed throw then the wavy is one to do! Enjoy this quick flick piccis on how to sort out those ends when changing colour. I’ll be bringing you a nice lacy join as you go method in the next few days 🙂


Thank you Bethany
LikeLike